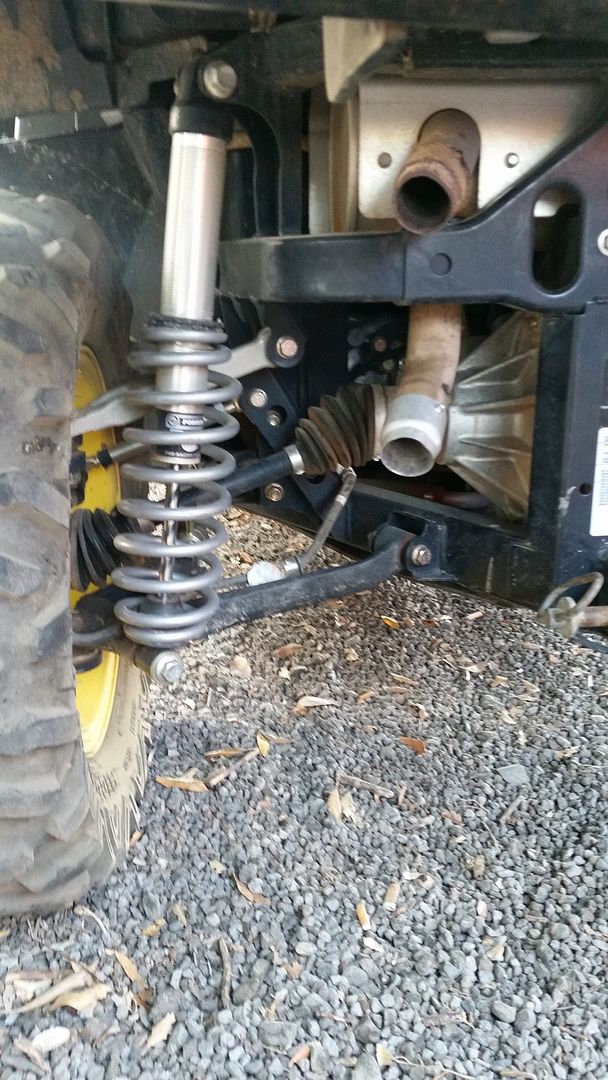
hey guys first off i just want to say wow very impressed with the gator. We took a trip to turkey bay(kentucky lake) for 4 days. If your not from my neck of the woods its full of hills with rocks tree roots and wash outs. Im just going to pass along my experience with the gator. To me it did extremely well i thought. My buddy and his dad both have t-rexs that did great of course and i was able to keep up and hang with them on every trail. I rode the middle man in the gator and we went up some nasty stuff that i would have thought the gator wouldnt of made it to the top but i did just fine. I only saw 2 down falls well maybe 3 if you count one of them. First i wish the gators low gear was a little bit taller, on some of the hills it was running very high rpms but still did good just wish it would maybe go to 30mph instead of 25. #2 which this could have been all in my head but i felt like the 4wd wasnt 50%front and 50%rear but maybe it was suppose be set up like that, it felt like the rear had 60% and the front axle was a 40% but like i said it could be all in my head to haha. 3rd The gator did great until today the last day and i was going down a hill and the oil pressure light came on and would go off when you hit the gas so i did the smart thing i hope and just put it on the trailer. I drove on the home and unloaded it and it hasnt came back on yet so it could be a sensor not for sure. I just wanted to share my experience with everyone and to tell you dont be scared of these things they are a beast of a work and play machine. Sorry for the long write up
↧
gator 825i trail riding review
↧
ecm
does anyone know if a ecm can be tested for a short
↧
↧
gatorsick
hello everone from ks,2012xuv625i rough idel,high then low.not a even idle speed??
↧
CV boot
I have a 2015 850i sport I rip a outer front boot over the weekend and my dealer told me there is no replacement part number . I order a 2013 boot , hope it works.my question is has anyone found aftermarket boot or has anyone cross reference it to a car one? And has anyone replaced one yet and can you stretch it over ? Thanks
↧
RSX 850i Tires
I have a set of Maxxis Bighorn 2.0 tires. Used for 1 month, very little wear.
Front -26x8x14
Rear - 26x10x14
$300.00
(231)920-5123
Will ship.....![]()
![]()
Sent from my iPad using Tapatalk
Front -26x8x14
Rear - 26x10x14
$300.00
(231)920-5123
Will ship.....


Sent from my iPad using Tapatalk
↧
↧
RSX 850i Poly Windshield
I have a Full Poly Windshield for an RSX 850i.
Clamps to the ROPS system. Used one season.
Excellent condition.
$200.00. Will ship....
(231) 920-5123![]()
Sent from my iPad using Tapatalk
Clamps to the ROPS system. Used one season.
Excellent condition.
$200.00. Will ship....
(231) 920-5123

Sent from my iPad using Tapatalk
↧
Need seat cover recommendations
Have a 2014 625I Gator with bench seats. Can someone recommend a source for durable seat covers for this vehicle?
Thanks in advance
Thanks in advance
↧
speed limiter
what options do I have to for removing speed limiter
↧
Weird stuttering/hesitation
So about a month ago I gave the gator a good pressure wash. Right after the wash I warmed it up and let it idle... It died on me a few times but then started to work fine. Since then I've been getting a weird hesitation/stutter under light acceleration/cruising it's like it hits a rev limiter momentarily. Has anyone ever experienced this or know how to fix it? I've checked the plugs, air filter, and I've run the gas to basically empty and re filled. Any help would be greatly appreciated.
↧
↧
No accessory position in ignition switch
The gator does not have an accessory position so you cannot run lights without the ignition in the run position which cannot be good since it has energized the a lot of circuits.
I want the ability to operate the OPS mounted lights independent of the key switch. I have the OPS switch box so there is only one circuit driving power to the OPS lights (wiper has separate power feed).
However, I like the safety of having the lights tied to the ignition switch most of the time. I am think about taking the OPS feed in the battery box area and attaching it to a 2 position switch. One side of the switch will be feed by the switched circuit and the other switch position would be connected to the battery always hot (behind a fuse so will tap another circuit like the unused cargo dumper) so I can use either power method.
Anyone else do this?
↧
860I ECU Software in 850I
Has anyone tried to put the new 860I Software into a 850I? The Part Number for the ECU thru Deere is the same on Both models so i cant see why this wouldnt work. The only reason i want to do this is to get Higher RPM out of my 850I. As Far as i can see The Engine is the same, The Clutch is the same, So this shouldnt effect anything except for the higher RPMS
↧
dual exhaust on a budget
after looking at aftermarket exhaust systems and their prices, I just couldn't justify the price for the potential gains, and I did not want my machine any louder, so I came up with my own remedy, got another spark arrester from deere, and added another outlet, the pipe is actually a tail pipe I removed from a 91 ford escort, it came out pretty good I think, and a noticeable change in performance with no extra noticeable noise, I used a plasma to cut the hole as I did not have the correct size hole saw, and welded it on
![]()
↧
best deals on JD parts??
Who generally has best prices on JD parts?
Thanks
Thanks
↧
↧
2008 Gator XUV 620i 4x4
Problem with toggle switches on dash - Emergency Flashers, Turn signals L & R, 2 WD to 4 WD all inop. Fuses were corroded have since cleaned up Fuse Block, new fuses installed. Also found no voltage to electric fan. Ordered new brake pads and all 12 bushings for rear suspension. It is up on stands waiting on parts for suspension. Sister bought this machine for my Brother-in-law birthday and ask me to check out these few issues. It is gas with 1710 hrs. good condition otherwise. Anyone that may experienced these problems in the past Your help will be Appreciated.
↧
new member here from il.
glad u all let me in on this forum I have a 1993 6x4 gator not to bad a shape we use it here for work in are garden works great for pulling are water tanks and hauling veg.in clean up at the end of year so far it has work great but now we cant get it to lock in 4 wheel drive .
when we put it in 4 wheel the shaft just seem to want to move in and out not staying locked in . first of all I have no manual just thought I would check and see if anyone ever had this and if they got it fix before I buy a $80 manual thanks in advance
when we put it in 4 wheel the shaft just seem to want to move in and out not staying locked in . first of all I have no manual just thought I would check and see if anyone ever had this and if they got it fix before I buy a $80 manual thanks in advance
↧
Fuel additives
Just curious do any of you here use a fuel additive to your gas engines in the 825i? I have not used any nor read where JD recommend it just wondering. Something that controls moisture build up and cleans the engine..not necessarily looking for more power out of the engine..
↧
855d
Hi all
I have a 855d that will not start. When I diconnect the lead at the starter solenoid and I put power to the starter it operates. But will not start.
I have checked the fuses and they look good.
I have by-passed the nuetral switch.
Any thoughts would be appreciated.
Bill
I have a 855d that will not start. When I diconnect the lead at the starter solenoid and I put power to the starter it operates. But will not start.
I have checked the fuses and they look good.
I have by-passed the nuetral switch.
Any thoughts would be appreciated.
Bill
↧
↧
John Deere Hood Rack (BM24980)
I purchased the front hood rack.
The installation was very easy. If English is not your native language, Spanish and French (likely Canadian French) labels are available.
Maximum interior rectangular sizes:
8-in. x 48-in.
11-in. x 44 1/4-in
13.5-in x 18 3/4-in
There are holes to bolt a floor to the rack. I plan to build a form fitting box for my chain saw that can be easily added or removed.
The biggest downside is it is harder to turn on the AC (what we call opening up the split windshield) or access the tray under the hood. You have to remove the brush guard pins and rotate it forward.
![]()
![]()
The installation was very easy. If English is not your native language, Spanish and French (likely Canadian French) labels are available.
Maximum interior rectangular sizes:
8-in. x 48-in.
11-in. x 44 1/4-in
13.5-in x 18 3/4-in
There are holes to bolt a floor to the rack. I plan to build a form fitting box for my chain saw that can be easily added or removed.
The biggest downside is it is harder to turn on the AC (what we call opening up the split windshield) or access the tray under the hood. You have to remove the brush guard pins and rotate it forward.


↧
John Deere Mid-range Light kit Install (BM24016)
I purchase the mid-range light kit. I have these mounted on the rear so I added two on the front leaving room for another pair.
![]()
The instructions seem to be written for a difference design lamp. For example, it tells you to drill a 6mm hole to mount the light but requires a 12mm (1/2-inch hole). It also suggest running the wires through the hollow mounting bolt but it is tough fit since the terminals include some sealing (water proofing) features.
Also, there is no mention of assembling the lamp connector. You need to insert the terminals (it requires a certain orientation to latch) and then put on a second rear snap. I had to remove the tie wrap on one end to expand the wires to fit the rear cap that captures the terminals. They also suggest a 10mm hole but the lamp connector once assembled is wider than that. This means once assembled you cannot remove the wire without enlarging the hole.
The lamp terminals as provided without the connector.
![]()
Assembled connector - note terminal orientation in connector.
![]()
I laid out the design for two lights. In hindsight, I should have moved the lights further back.
![]()
The biggest challenge was cramming all those wires in the OPS switch box. Per John Deere style, they always use one power tap and then provide a second for the next daisy chained accessory. The cable harness for the OPS wiring and the lights (rear and now front) was a stiff mess because they wrapped electrical tape on all wiring intended to be in the inside the box. After some long time trying to cram it all in, I gave up and removed most of the electrical tape to make the wiring more flexible. After doing this, I was able to fold the wiring in the box to actually get the box to seal properly. When I add the next set, I will have to do it again.
![]()
The cable harness is designed to fit front and rear position (a different part number for S4 models) so had to hide some of the excess. I will likely trim this (cut and remove excess and then reconnect).
Finished
![]()

The instructions seem to be written for a difference design lamp. For example, it tells you to drill a 6mm hole to mount the light but requires a 12mm (1/2-inch hole). It also suggest running the wires through the hollow mounting bolt but it is tough fit since the terminals include some sealing (water proofing) features.
Also, there is no mention of assembling the lamp connector. You need to insert the terminals (it requires a certain orientation to latch) and then put on a second rear snap. I had to remove the tie wrap on one end to expand the wires to fit the rear cap that captures the terminals. They also suggest a 10mm hole but the lamp connector once assembled is wider than that. This means once assembled you cannot remove the wire without enlarging the hole.
The lamp terminals as provided without the connector.

Assembled connector - note terminal orientation in connector.

I laid out the design for two lights. In hindsight, I should have moved the lights further back.

The biggest challenge was cramming all those wires in the OPS switch box. Per John Deere style, they always use one power tap and then provide a second for the next daisy chained accessory. The cable harness for the OPS wiring and the lights (rear and now front) was a stiff mess because they wrapped electrical tape on all wiring intended to be in the inside the box. After some long time trying to cram it all in, I gave up and removed most of the electrical tape to make the wiring more flexible. After doing this, I was able to fold the wiring in the box to actually get the box to seal properly. When I add the next set, I will have to do it again.

The cable harness is designed to fit front and rear position (a different part number for S4 models) so had to hide some of the excess. I will likely trim this (cut and remove excess and then reconnect).
Finished

↧
850i headlight switch
The switch is a two position but only one position turns on lights on mine. I thought that the first position would turn on the low beams and the second would turn on both. Is that true? Mine only turns on both.
↧